You're reviewing a renewal, a consignment schedule, or a private collection worksheet. One line says fine art. Another says fine arts. In ordinary conversation, those terms blur together. In underwriting, valuation, and claims, they don't.
That gap matters most when a jeweler, collector, or broker assumes the label is harmless shorthand. It often isn't. The label can determine whether an item belongs on a scheduled fine-art form, under business personal property, inside a collectibles endorsement, or nowhere useful at all.
I've seen the confusion show up in predictable places. A jewelry store adds a one-of-a-kind sculpture to the showroom because it complements a designer line. A private client owns both original paintings and editioned photographic works. A broker receives an application that asks about “fine arts” and answers it as if the carrier were asking about any creative object of value. Those aren't academic errors. They create openings for valuation disputes, incomplete descriptions, and policy mismatches that only become obvious after a loss.
The Subtle Distinction with Major Financial Consequences
The problem usually starts with a reasonable assumption. A client thinks, “It's art, so it must be fine art.” A broker thinks, “The insured studied fine arts, so the work they produce belongs under fine-art coverage.” Both statements can be directionally understandable and still wrong in a policy file.
Where the misunderstanding shows up
A jewelry retailer is a good example. The store may carry custom pieces, display objects, antique frames, mineral specimens, and a few gallery-style works for atmosphere or sale. If those items are folded into general inventory without careful classification, the insured may discover too late that the policy treats them differently from scheduled fine art.
The same issue affects collectors. A client may own a unique painting, a series of signed prints, and a decorative object made by a studio artist. All are valuable. All may be aesthetically important. But they don't always belong in the same coverage bucket, and they won't always be adjusted the same way after transit damage, breakage, restoration, or partial loss.
Practical rule: If an item's identity, uniqueness, and provenance drive its value, don't assume a broad property form will respond the way a fine-art form would.
Why this becomes expensive
Insurance disputes rarely begin with dramatic legal arguments. They begin with ordinary paperwork. The item description is too broad. The schedule says “artwork” instead of identifying the object. The valuation support doesn't distinguish a unique work from an editioned piece. The insured believes replacement cost logic applies, while the carrier is looking at market comparables, sublimits, or category definitions.
For jewelers, the stakes can be even sharper because the business already manages concentrated value, transit exposure, showcase exposure, consignment arrangements, and customer expectations. Adding art objects into that environment without precise terminology invites avoidable friction. The issue isn't just whether a piece is covered. It's whether it's covered in the right way, for the right amount, under the right wording.
Defining Fine Art and Fine Arts
The cleanest way to separate the terms is this. Fine art is usually the object. Fine arts is usually the field, discipline, or category of study and practice.
Fine art as the insured object
In practical insurance language, fine art usually refers to the specific thing being insured. That could be a painting, sculpture, unique photograph, studio glass work, or another object created primarily for aesthetic or intellectual value rather than practical use.
Historically, the term came from the older European academic idea of the “five main fine arts,” namely painting, sculpture, architecture, music, and poetry. In modern usage, especially in education and the art market, the term has narrowed in practice and is often applied primarily to the visual arts, though it can still include media such as film, photography, video production or editing, studio pottery, and studio glass. The key distinction is purpose. Fine art is generally created for beauty, meaning, and expression, while decorative or applied arts are expected to serve a practical function as well, as described in this overview of the historical development of fine art.

Fine arts as the broader discipline
Fine arts usually refers to the larger domain in which art is taught, studied, and practiced. Think of a university's Department of Fine Arts, a Bachelor of Fine Arts degree, or a professional path in painting, sculpture, photography, performance, or related disciplines.
That difference sounds small until you apply it to insurance. A person may have a fine arts degree. The work they produce may or may not qualify as fine art for scheduling and valuation purposes. A gallery may represent artists trained in fine arts. Not every item in the gallery will carry the same underwriting characteristics.
The distinction that matters in risk review
When I review art-related schedules, I don't start with the artist's résumé. I start with the object itself.
Ask these questions:
- What is the item? A unique original object, an editioned work, or a decorative object with artistic value.
- Why was it made? Primarily for expression, or for practical and commercial use.
- How is it valued? Through provenance, condition, rarity, and market history, or through broader replacement logic.
Those questions get you closer to the insurable reality than the vocabulary alone.
Comparing Usage Across Different Contexts
Words shift meaning depending on who's using them. That's why the fine art vs fine arts distinction causes confusion. Academia, galleries, collectors, and insurers all use related language, but they're not solving the same problem.
Fine Art vs. Fine Arts A Contextual Comparison
| Context | Fine Art (The Object) | Fine Arts (The Discipline) |
|---|---|---|
| Academia | A work submitted, exhibited, critiqued, or archived as an individual piece | A course of study, department, degree program, or faculty area |
| Gallery and museum use | An object in a collection, exhibition, consignment, or sale | A broad label for artistic practice or institutional programming |
| Insurance and appraisal | A specific item that may need scheduling, appraisal, condition reporting, and specialized settlement terms | A descriptive category that may be too broad to determine coverage without object-level detail |
| Everyday language | “A piece of fine art” usually means a specific artwork | “The fine arts” usually means art forms collectively |
Where people get crossed up
In academia, broad usage is normal. A school can refer to painting, sculpture, photography, music, and other creative practices under the umbrella of fine arts without causing trouble. The term works because the institution is categorizing education.
In a gallery or museum, usage is more flexible. Curators and dealers may use fine art to describe the object and fine arts to describe the broader cultural field. That flexibility works because the context usually supplies the missing nuance.
Insurance contracts don't have that luxury. Coverage depends on definition, attachment point, valuation method, exclusions, and settlement wording. If the schedule says “fine arts inventory” but the policy defines covered property in object-specific terms, the insured may think the category carries the day. It often doesn't.
In underwriting, broad labels are a starting point. Claims are adjusted on the actual item, its documentation, and the policy wording attached to it.
The insurer's usage is the one that counts
This is the point brokers and high-value clients need to keep front of mind. The museum's catalog language won't decide a claim. The insured's casual description won't decide a claim. The policy will.
That's why I encourage clients to translate every art-related item into contract-ready language before binding coverage. If the object is unique, say so. If it's editioned, identify the edition details. If it's decorative, functional, or mixed-use, don't force it into a fine-art category just because it's expensive or handmade.
The best schedules read like disciplined inventory records, not gallery wall text.
Real-World Scenarios for Jewelers and Collectors
A lot of misunderstanding disappears once you test the terms against actual holdings.
A jeweler with art in the showroom
A jewelry store may display a unique bronze sculpture near the entrance, a hand-thrown ceramic vessel in a bridal case, and framed photographic works in a consultation room. The owner may think of all three as part of the store's visual identity. From an insurance standpoint, each needs its own analysis.
If the sculpture is a unique object acquired for display and investment, it may belong on a fine-art schedule. If the ceramic vessel functions as décor and could be treated as a decorative object, the treatment may differ. If the photographs are editioned works, the underwriting and valuation approach may not match the bronze at all.

For jewelers who are already used to detailed stock records, the discipline carries over well. The same habits that protect diamond inventory also help with art objects. Strong photographs, acquisition records, maker identification, and accurate location tracking matter. Even a showroom planning image, such as this jewelry display reference, reminds owners that presentation value and insurable value are not the same thing.
A collector with originals and editions
Collectors often own across categories without realizing the insurance consequences. One wall may hold an original oil painting. Another may hold signed prints from an artist whose work has become sought after. The owner sees a coherent collection. The underwriter sees distinct risk characteristics.
That difference lines up with how fine arts functions outside the insurance world. In U.S. education data, 108,688 fine arts degrees were conferred in 2019, with 82.6% at the bachelor's level, 15.7% at the master's level, and 1.7% at the doctoral level. The same source notes a 38.6% men and 61.4% women split, and reports that the Bureau of Labor Statistics lists craft and fine artists with a 2024 median annual wage of $56,260, projecting little or no employment change from 2024 to 2034 while still expecting about 4,400 openings each year, according to this summary of fine arts majors statistics and labor data. That tells you fine arts is a real educational and occupational pipeline. It doesn't tell you that every output from that pipeline should be insured identically.
A wholesaler adding art objects
Wholesalers and manufacturers sometimes branch into adjacent luxury categories. The move makes commercial sense. The insurance challenge is classification creep. The firm still thinks like a jewelry business, but some of the inventory now behaves like art, some like décor, and some like high-end merchandise.
That's when broad descriptions become dangerous. “Art pieces” is not enough. Item-level identity is what keeps the account clean.
How Wording Affects Your Insurance Coverage
Coverage problems almost always trace back to wording before they trace back to value. If the language is wrong, even a strong appraisal can only do so much.
Policy definitions drive outcomes
An insurer may define covered property narrowly, broadly, or somewhere in between. A scheduled fine-art form often assumes object-level specificity. General business property wording often assumes category-based treatment. Those are different machines.

When you review a policy, don't stop at the declarations page. Read the definitions, valuation clause, transit language, restoration treatment, pair and set language if relevant, territorial limits, and any sublimits for items away from premises, in exhibitions, or in the custody of others.
Coverage test: If you had to present the item to a claims adjuster who has never seen your collection, would the schedule and policy language identify exactly what it is and how it should be valued?
Sample wording issues to look for
These are the phrases that deserve scrutiny:
“Covered property includes scheduled fine art as described.”
That wording can work well, but only if the descriptions are exact.
“Property of a decorative or utilitarian nature is excluded unless specifically endorsed.”
That kind of sentence can separate a collectible object from a covered fine-art item very quickly.
“Loss will be settled at the lesser of cost to repair, replace, or the applicable limit.”
That may be very different from the expectation a collector has for a unique work.
A short visual guide can help frame the review process before renewal discussions. This carrier-market reference image is a reminder that specialty markets often use highly specific language, and that specificity is exactly why wording review matters.
A practical overview is also worth watching before you revisit your schedule:
Questions worth asking before binding
Use a broker or underwriter conversation to pin down the details:
- How does the policy define covered fine art? Ask for the definition in writing.
- Are editioned works treated differently from unique works? If yes, ask how valuation is handled.
- Does the policy address restoration and diminution issues? That matters after partial damage.
- What happens in transit or while on consignment? Possession changes can change exposure.
- Are decorative or functional art objects included, excluded, or subject to endorsement? Don't guess.
Clients get into trouble when they insure by category name instead of by contract language. Fine art vs fine arts sounds semantic. In a claim file, it becomes operational.
Best Practices for Valuation and Appraisals
Correct classification is only the first half of the job. The second half is proving value in a way that survives scrutiny.
Unique works need deeper support
The fine art versus fine arts divide often turns on reproducibility and intended use. Commentary on the topic notes that fine-art objects are commonly unique artifacts made for their own aesthetic or intellectual value, while graphic or applied arts are designed for reproducible media and practical or commercial functions. In insurance practice, that distinction matters because unique works have higher provenance sensitivity, more demanding condition-reporting needs, and non-replicable loss characteristics, while editioned works are often valued with attention to printing method, edition size, and market comparables, as discussed in this piece on the difference between fine arts and visual arts in practice.

A unique painting should usually be supported by more than a purchase receipt. Provenance, exhibition history, prior restoration, medium, dimensions, signature details, and current condition all matter. A condition report done before transit or consignment can save weeks of argument later.
Editioned and mixed-category objects need precision
Editioned prints, artist-made multiples, studio pottery, and crossover objects often create the most confusion. They can be highly valuable and fully legitimate collecting targets, but they must be described with care.
A workable checklist looks like this:
- Identify the medium clearly: Don't say “art print” if it's an archival pigment print, etching, lithograph, or another process.
- Record edition details: Numbering, artist proofs, and publication details can affect comparability.
- Separate artistic value from decorative use: If an object is functional, say so and insure it accordingly.
- Match the appraiser to the medium: A jewelry appraiser isn't automatically the right choice for studio glass or photography.
For owners who need a neutral dispute-resolution framework or a deeper look at contested values, resources on appraisal for Oregon property owners show the kind of formal appraisal process that can become relevant when parties disagree on loss valuation.
A strong appraisal doesn't just assign a number. It explains why that number fits the specific object.
Secure Your Collection with a Specialist Partner
The fine art vs fine arts distinction sounds academic until a loss exposes the gap. Then it becomes a coverage issue, a valuation issue, and sometimes a reputation issue. For jewelers and collectors, a single item can carry concentrated financial value and emotional significance at the same time.
The practical lesson is simple. Don't insure by vibe, and don't schedule by shorthand. Identify the object accurately, classify it correctly, support the value properly, and make sure the policy language matches the way the piece will be stored, displayed, transported, and claimed.
Protection goes beyond the policy
Good risk management also extends to storage, handling, and documentation. Owners who maintain mixed collections should understand environmental controls, packing methods, and off-site storage standards. A practical guide on how to store artwork is useful because storage decisions often affect condition, and condition affects value.
If you're reviewing a collection with a broker, even visual references tied to trade associations, such as this industry association logo reference, can serve as a reminder that specialty categories work best when handled by people who know the trade language, the market, and the claims habits of the sector.
Specialized assets need specialized thinking. That includes jewelry stock, private collections, consigned objects, and art-adjacent luxury property. The right advisor won't blur those categories just to make the application easier. They'll separate them carefully so the coverage works when it's needed.
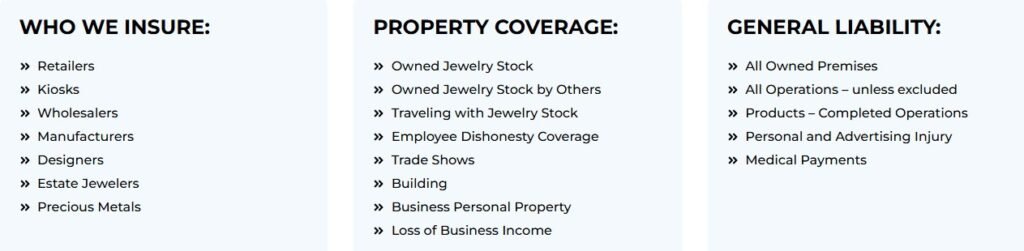
If you need help reviewing Jewelers Block insurance, art-related exposures, or high-value collection coverage, contact First Class Insurance. Their team works with jewelers, collectors, and brokers who need precise protection for inventory, transit, display, and specialty assets without leaving critical classification gaps in the policy.